
How to Clean Snow Off Solar Systems: Solar Panel Snow Removal
- Sarah Lozanova

- Jan 23
- 10 min read
Updated: Feb 14
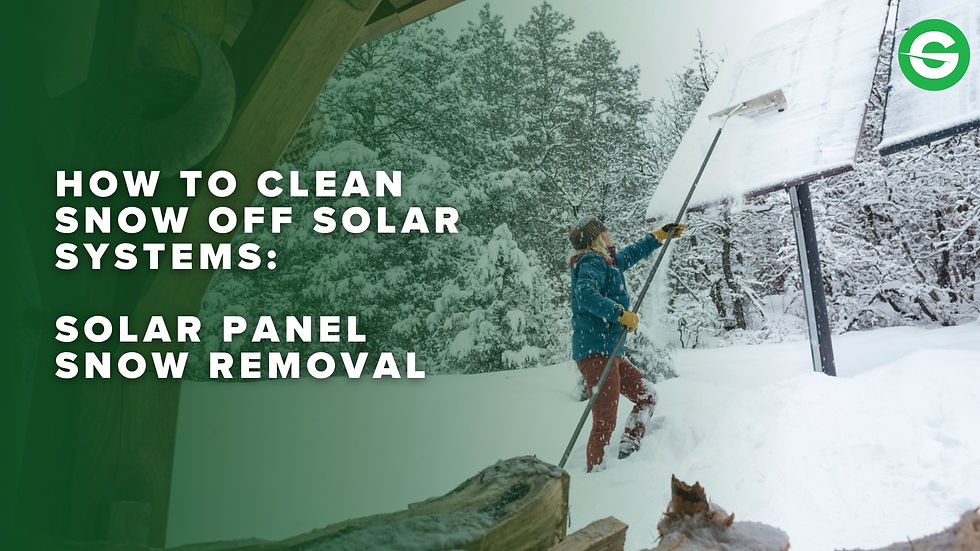
Table of Contents
Winter snow can cut solar production when it builds up on your array, but you don’t always need to take action. A light dusting often slides off or melts on its own. Heavy, wet snow can cover the modules long enough to block sunlight and push output close to zero until the panels clear.
If you get frequent storms or long stretches below freezing, it helps to know how to remove snow from solar panels safely. The best DIY approach for most homeowners is a ground-based solar panel snow removal tool, like a solar panel snow rake with a foam or rubber head. Just as important: knowing when to let snow melt naturally, and when clearing snow off solar panels is worth the effort.
With over 12 years of experience in the solar industry, GreenLancer is here to guide homeowners on how to clean snow off solar panels safely and effectively. Whether you need advice on solar panel snow removal or ongoing system maintenance, we’re here to help you get the most from your solar investment, regardless of the weather.
How to Clean Snow Off Solar Panels Safely
Winter conditions add two risks at the same time: slipping hazards and accidental damage to the glass, wiring, or racking. The safest approach to solar panel snow removal is the one that keeps you on the ground and uses the right tool. If you can’t clear snow off solar panels safely from the ground, it’s usually better to let snow melt naturally or call a professional.
Quick answers: solar panel snow removal in 60 seconds
Use this quick checklist to decide whether solar panel snow removal is worth doing
When you should remove snow from solar panels
Solar panel snow removal is most useful when snow is likely to sit on the array for days and block sunlight. Consider clearing snow off solar panels when:
Heavy, wet snow covers most of the array and doesn’t slide off
Temperatures stay below freezing for an extended stretch, so natural melt won’t happen soon
You have a low-tilt array or low-slope roof where snow tends to stick
Your roof plane is shaded (trees, dormers, chimneys), slowing melt-off
Your monitoring app shows near-zero production, and you don’t expect warmer temps soon
When to let it melt naturally
In many cases, you don’t need to remove snow from solar panels at all. Let snow melt naturally when:
Snow is light and powdery, and the forecast includes sun + above-freezing temps soon
Your array is on a steeper tilt, so snow usually sheds on its own
You can’t reach the modules safely from the ground without a ladder
Conditions are windy, icy, or low visibility, or you’d be standing in the drop zone, where snow can slide off suddenly
Safest DIY approach: a ground-based solar panel snow rake
For most homeowners, the safest solar panel snow removal tool is a solar panel snow rake designed for PV modules (look for a foam or rubber head and an extendable pole). When using a solar panel snow rake:
Stand to the side of the array, not directly below it
Use light passes to pull loose snow down (don’t push heavy slabs)
Keep the rake head flat so you don’t catch the panel frame or racking edge
Stop if you hit ice — don’t chip or pry
What to avoid when removing snow from solar panels
Some “quick fixes” can crack glass, scratch the surface, or create serious safety risks. Avoid:
Roof climbing unless you have proper fall protection and experience
Metal scrapers, shovels, or sharp tools that can scratch the glass or damage wiring
Hot water, which can cause thermal shock in freezing conditions
Chemicals or de-icers, which can leave residue and damage roof/system materials
How Snow Affects Solar Panels in Winter
Snow affects solar in a pretty straightforward way: it either blocks light from reaching the cells, or it creates uneven shading across the array that limits how much power your system can produce until the panels clear.
Snow on solar panels vs. real output loss

When solar panels are fully covered
If snow on solar panels completely covers the glass, sunlight can’t reach the cells in a meaningful way. In that situation, production can drop close to zero until the snow slides off or melts. Your monitoring app may show a flat line during the covered period, especially after heavy, wet snow.
Why partial snow coverage can still matter
Even a smaller patch of snow can cause a bigger drop than you’d expect, depending on how your system is wired and what electronics you have:
String inverter systems: Solar panels are typically connected in “strings.” If one or a few modules in a string are heavily shaded by snow, that can limit current for the whole string, reducing output more than the snow-covered area alone would suggest. (Bypass diodes help, but you can still see noticeable losses.)
Module-level electronics (microinverters or DC optimizers): These handle each panel more independently. That usually means partial snow on one module has less impact on the rest of the array. But if a panel is covered, that panel still won’t produce much until it clears—microinverters can’t make power without light.
Does snow damage solar panels?
Usually not, if you don’t scrape or impact the glass
Most solar panels are built to handle cold, snow, and winter weather. Snow sitting on the array doesn’t typically harm the modules by itself. The bigger risk comes from how snow is removed (scraping, prying, or hitting the surface) and from ice-related stress points.
Where problems actually come fromDamage is more likely when winter conditions create extra stress or when removal methods are too aggressive:
Ice edge buildup: Freeze–thaw cycles can form a ridge of ice along the bottom edge of the array. That “lip” can trap new snow, keep panels covered longer, and tempt people to chip at the ice (which is risky for glass and frames).
Microcracks from impact: Striking the module (even accidentally) with a hard tool, shovel edge, or metal scraper can create tiny cracks that may reduce performance over time.
Mounting stress and shifting snow loads: Uneven snow melt can create heavier patches that add stress to rails, clamps, and roof attachments—especially during repeated storms.
Roof-related issues: Ice dams, sliding snow sheets, and frozen gutters can create hazards below the array (walkways/driveways) and may contribute to roof leaks or water backup that homeowners mistake for a “solar problem.”

Solar Panel Snow Removal Tools
The right solar panel snow removal tool helps you clear snow without scratching PV glass, bending frames, or yanking on wiring. For most homeowners, the safest goal is to remove snow from solar panels from the ground using soft, non-metal contact surfaces.
Solar panel snow rake (best homeowner tool)
A solar panel snow rake is usually the best option for clearing snow off solar panels because it’s designed to glide over the surface without gouging it.
Foam/rubber head vs. brush head
Foam or rubber head: safest for glass and frames, especially when snow is wet or compacted
Brush head: okay for light, dry snow if the bristles are soft—avoid stiff bristles that can trap grit and scratch
Pole length guidance
Single-story homes: often need roughly 15–20 ft of reach
Two-story homes: often closer to 20–30 ft, depending on roof pitch and where the array sits. If you’re leaning, stretching, or losing stable footing, stop—safety matters more than squeezing out a little extra winter production.
What to look for
Lightweight pole, non-metal edge, smooth head that won’t catch the frame, and a replaceable head so you can swap it out if it wears down.
Solar panel snow removal tool alternatives (when they make sense)
These can work in specific setups, especially if you’re trying to clean snow off solar panels gently without pulling heavy loads.
Soft snow broom (best for ground mounts): useful for light snow on reachable panels; use gentle passes and avoid pressing down on the glass
Why a standard roof rake can be risky: hard edges and exposed fasteners can scratch glass, and the extra leverage makes it easy to push too hard into frames or racking
Tools to avoid for removing snow from solar panels
Skip anything that can scratch, chip, or cause thermal shock, including:
Metal scrapers or shovels
Hard-bristle brushes
Pressure washers
De-icing salts or chemicals
Hot water

How to Remove Snow From Solar Panels Step by Step
The safest way to remove snow from solar panels is to work from the ground with a solar panel snow removal tool designed for PV glass. You’re aiming to clear loose snow so sunlight can reach the modules again, without scraping, prying, or forcing ice.
How to clear snow off solar panels from the ground
Set up a safe stance - Stand on stable ground, keep your feet wide, and position yourself to the side of the array (not directly below it). Snow can fall in sheets.
Use a solar panel snow rake the right way - Use a solar panel snow rake with a foam or rubber head. Keep the head flat against the snow layer and pull the snow downward in small passes.
Start from the lower edge and work upward - Clearing a path at the bottom helps prevent snow from re-piling as it slides. Work gently—don’t push hard into the frame.
Stop at ice - If you hit an icy ridge, don’t chip or pry. Clearing snow off solar panels is safe; breaking ice often isn’t.
Clearing snow off solar panels on ground mounts
Ground mounts are easier to access, but you still want a light touch during solar panel snow removal.
Use a soft head or broom and clear snow with gentle, sweeping passes
Avoid leaning your body weight onto the modules
Watch for exposed wiring, conduit, and module edges so you don’t snag anything
If snow is heavy and frozen to the surface, let it soften naturally rather than forcing it off
Safety Tips for Solar Panel Snow Removal
Safety matters more than squeezing out a little extra winter production. If you can’t remove snow from solar panels from the ground without risky footing or ladder work, it’s usually better to let snow melt naturally or call a professional.
Roof safety: when to call a professional
Choose pro help instead of DIY solar panel snow removal if:
You can’t reach the array safely with a solar panel snow rake from the ground
The roof is steep, icy, or you’d need to work near edges or above walkways
Snow routinely slides off the array in large sheets (impact risk below)
You’re dealing with persistent ice buildup at the bottom edge of the panels
Prevent accidents while cleaning snow off solar panels
Use these basics any time you’re clearing snow off solar panels:
Stay off the roof when possible. A ground-based solar panel snow removal tool is the safest DIY option.
Wear traction footwear. Non-slip winter boots help on icy driveways and packed snow.
Avoid wind and low visibility. Don’t try to clean snow off solar panels during storms or gusty conditions.
Keep a drop zone clear. Stand to the side and keep kids and pets away—snow can release suddenly.
Don’t use risky tools. Skip metal scrapers, hot water, and chemicals when removing snow from solar panels.

How to Keep Snow Off Solar Panels
You can’t prevent every storm, but you can reduce how often you need solar panel snow removal by making it easier for snow to shed naturally and by avoiding conditions that “trap” snow on the array.
How to prevent snow buildup on solar panels
✅ Tilt matters. Steeper panels shed snow faster. Low-tilt arrays tend to hold snow longer, which increases the need to clear snow off solar panels after storms.
✅ Sun exposure helps. South-facing roof planes with good winter sun usually melt off sooner than shaded sections. Chimneys, dormers, and nearby trees can create shade that keeps snow on solar panels longer.
✅ Airflow under the array. Panels mounted very close to the roof can stay colder and hold snow longer. A bit more standoff can improve airflow and help snow release sooner.
✅ Avoid “snow trap” areas. Roof valleys and spots where drifting piles up can keep fresh snow packed against the lower edge of the array.
Solar panel snow guard options and when they help
A solar panel snow guard (sometimes called a snow retention device) is most useful when sliding snow creates a safety issue below the array, like over a driveway, walkway, or entry. Snow guards break up large slabs into smaller releases, which can protect gutters and reduce sudden slide hazards.
One tradeoff: on some roofs, snow guards can hold snow longer, so they’re more about managing snow slide risk than eliminating snow buildup. If your main goal is reducing solar panel snow removal, improving shedding (tilt/exposure), and using a safe solar panel snow rake from the ground often helps more.
Examples of Alpine SnowGuards:
Solar SnowMax-Universal: Fits many roof types and reduces large snow slides.
Solar Snow Dog: Durable option designed to keep snow from accumulating on the array.

Ice at the Bottom of the Array
Ice buildup along the lower edge of an array is one of the main reasons snow on solar panels won’t slide off, even when the panels are tilted.
Why snow won’t slide off the panels
During freeze–thaw cycles, meltwater can refreeze at the bottom edge of the modules and form a small “ice lip.” That lip traps new snowfall, so even after you clear snow off solar panels, fresh snow can keep sticking until the ice softens.
What to do and what not to do
What you can do safely:
Use a solar panel snow rake to remove loose snow above the ice line (gentle passes only)
Monitor your production and wait for a sunny or above-freezing window to clear the ice naturally
Keep the drop zone below the array clear in case snow releases suddenly
What to avoid:
Don’t chip or pry at ice with tools
Don’t pour hot water on the modules (thermal shock risk)
Don’t use chemicals or de-icers on the array or roof near the system
If ice buildup is persistent and you can’t safely reach the array from the ground, that’s a good time to call a professional.
Microinverters and Optimizers in Snow
Module-level electronics can reduce losses from partial shading, but they don’t eliminate the need for snow to clear.
Do microinverters help when panels are snow-covered?
If you have microinverters or DC optimizers, one snow-covered panel usually won’t drag down the entire array the way it can with a traditional string inverter. That said, a panel that’s fully covered still won’t produce much until you remove snow from solar panels or it melts naturally.
How to use monitoring to decide on solar panel snow removal
Your monitoring app is your best decision tool:
Near-zero production during a storm is normal if the array is covered
If production stays unusually low for days after panels look clear, you may have another issue (faults, tripped breaker, damaged module, or a wiring problem)
Maximizing Winter Energy Production After Snow Clears
Once the panels are clear, a quick check helps confirm your system is back to normal.
Quick post-storm checks homeowners can do
Check your monitoring app to confirm output rebounds after the snow clears
Do a visual check from the ground for shifted panels, obvious cracks, dangling wires, or anything out of place
If output stays low, note the date/time and any alerts in the app—this helps if you need support
If you’re seeing repeated winter shutdowns, recurring alerts, or production that doesn’t recover after snow events, it may be time for a service visit.
Maximizing Winter Energy Production
Keeping your panels clear is one of the most effective ways to maintain strong winter energy production. Snow blocks sunlight and can significantly reduce output, so safe, consistent solar panel snow removal helps your system stay efficient even in harsh conditions.
Using non-abrasive solar panel snow removal tools, allowing natural melting when conditions allow, or installing solar panel snow guards all help prevent long-term wear and keep your system generating power reliably. Homeowners in snowy climates benefit from making winter solar maintenance a simple annual routine, ensuring panels stay clear, protected, and productive throughout the coldest months.

Image credit for third from the bottom photo: Jeffrey Mabee


Comments